A month or two ago. The number of games I downloaded kept increasing. Not only did I have a lot of unplayed games in stock, but I also didn't want to delete the ones I had played. My hard drive space was running out, so I bought another hard drive.
My small computer case only had one hard drive slot, so it took a lot of effort to install two hard drives. I attached some iron plates or something to the hard drive rack and squeezed in two hard drives. After storing game software and other data, I found that one of the hard drives was rarely used and it might have heat dissipation issues when squeezed together in the summer, so I took it out again.
Afterwards, I used it and other old components in my house to build a Ubuntu physical machine, thinking that I could use it to set up a local area network for file storage.
I finally found some time recently, so I'm going to give it a try!
Since I don't have an extra wireless network card, I plan to use a router (secondary router) in my room to create a wired LAN, and then bridge it wirelessly to the router (main router) in the living room. If it's a newer router, bridging is easy. But mine is an old router, so it's a bit more complicated.
Bridging the Router#
Reference:
Complete tutorial on wireless router bridging https://zhuanlan.zhihu.com/p/46501763
The most detailed tutorial on bridging old wireless routers on the whole network https://blog.csdn.net/kaihang_cai/article/details/105979663
1. Main Router Settings#
1.1 Take note of the main router's information: LAN IP, DNS
1.2 Set up DHCP address pool to reserve addresses for the secondary router
2. Secondary Router Settings#
2.1 Set LAN IP
Access the settings interface of the secondary router and click "Network Parameters" -> "LAN Port Settings". If the LAN IP of the main router is [192.168.2.1], then set the LAN IP of the secondary router to [192.168.2.2].
2.2 Bridge the main router
Click "Wireless Settings" -> "Basic Settings", check the WDS option, and click "Scan".
Click "Scan" to bring up this interface, find the main router, take note of the channel, and click "Connect".
Then set the channel and the WiFi password of the main router.
2.3 Set up DHCP address pool
Click "DHCP Server" -> "DHCP Service" and set the address pool to avoid overlapping with the main router. Fill in the gateway and DNS based on the information obtained in 1.1 Take note of the main router's information: LAN IP, DNS.
Once the above steps are completed, the router bridging is done.
After setting up the network, I tried to use the local network file sharing feature in Ubuntu, but for some reason, I couldn't get it to work.
So I gave up! I went to sleep and started over the next day. 🤣 It turns out that saying is true, sometimes you just need to approach things from a different angle.
Transferring Files Using FileZilla#
Reference:
Transferring files between Windows 10 and Ubuntu using FileZilla https://blog.csdn.net/qq_28077617/article/details/127000655
Simple three-step file transfer between Windows 10 and Ubuntu https://blog.csdn.net/songyunli1111/article/details/79792958
1. Ubuntu Setup#
1.1 Install FTP service
Open the terminal and execute the following command:
sudo apt-get install vsftpd
After installation, open /etc/vsftpd.conf with the following command:
sudo gedit /etc/vsftpd.conf
Find the following two lines in the file and make sure there is no "#" in front of them (make sure they are valid and not commented out):
local_enable=YES
write_enable=YES
If there is a "#" in front of them, remove it, save the file, and exit.
Restart the FTP service with the following command:
sudo /etc/init.d/vsftpd restart
Make sure to have
local_enable=YESandwrite_enable=YESlines, otherwise file download and upload may not work properly.
1.2 Install SSH service
Open the terminal and execute the following command:
sudo apt-get install openssh-server
2. Windows Setup#
2.1 Download FileZilla
Download link: https://filezilla-project.org/
2.2 Connect to Ubuntu using FileZilla
See: Transferring files between Windows 10 and Ubuntu using FileZilla https://blog.csdn.net/qq_28077617/article/details/127000655
Open FileZilla, click "File" > "Site Manager", create a new site and configure it:
After completing the above steps, you will successfully connect to Ubuntu.
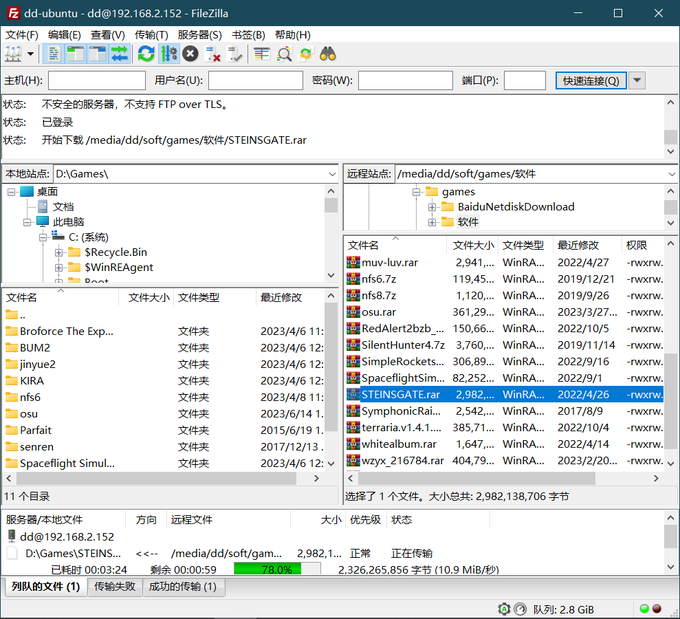
The Ubuntu and Windows file systems are different, and disk partitions are not assigned drive letters in Ubuntu, but are mounted on a folder.
When I first connected, I couldn't find the disk where I installed the software and games. So I checked Ubuntu and found that the path was /media/dd/soft, and the pattern is probably "/media/username/volume label".
In FileZilla, I found the soft folder and tested it by transferring files, and it was successful.
Although it can be considered a success, the work is not over yet.
After restarting Ubuntu, I found that the soft folder was gone when I connected again. I looked into it and found that the disk partition was not mounted.
Every time I start the computer, I have to manually mount the disk partition in Ubuntu before I can access it. This is not acceptable.
Automatically Mounting Disk Partition on Ubuntu Startup#
Reference: Mounting Hard Disk Partitions on Ubuntu Startup https://zangchuantao.com/tech-zh/2020/ubuntu-mount-on-bootup/
1. View Partition Information#
Open the terminal and enter the following command:
sudo blkid
This command will list the UUID and file system type of all partitions. Find the partition you want to mount and record its UUID and type information, as shown below:
2. Modify Configuration File#
Open the /etc/fstab file with the following command:
sudo gedit /etc/fstab
Add the following content to the end of the file based on the information obtained in the previous step:
Line 14 is commented out with "#", it can be added or not added
Line 15 consists of six items:
- The first item is the UUID of the partition filled in the previous step
- The second item is the folder where the hard disk will be mounted, I used the default path of manually mounting the disk
/media/dd/soft(/media/username/volume label) - The third item is the file system type, filled in with
ntfsbased on the previous step - The fourth item is filled with
defaults - The fifth item is filled with
0 - The sixth item is filled with
2
Each item is separated by one or more spaces, and it is best to align them with the previous lines for readability.
Save and exit the file, then restart the system to take effect.
That's it, it's done. The screenshots in this article were also transferred using FileZilla: I took screenshots in Ubuntu, accessed the image folder using FileZilla on Windows 10, and dragged the images to the desktop. It's very convenient, maybe because it's the result of my busy work for a few days, but I have to say it's really useful.